Applet Editor
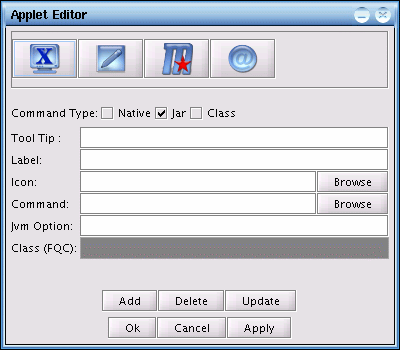
The Applet Editor consist of two panels.
The first panel is the configured applet panel. It represents the actual
position and invokation parameters of each of the current available
desktop applet launchers. The editor allows the user to select the
Command Type, the individual configuration details and the desired
functions to manipulate the actual desktop task bar applet launchers. A
user can basically add, delete and update any item that they have
selected. A selected item is the item that the user has clicked on in
the editor's applet panel and it is also the item that is currently
highlighted. When a user add, delete or update an item in the editor's
applet panel, it does not directly take effect in the actual desktop
task bar until the user clicks on the Ok or Apply button to finalize
the changes. If the Ok button is clicked, the changes will take effect
on the desktop task bar and the applet editor will be closed. The Apply
button allows the changes to take effect but the applet editor will not
be closed. When the user clicks on the Cancel button, no changes will
occur to the actual desktop task bar applet launchers, however, the
editor's applet panel will retain its current changes.
Configuration Parameters
The Command Type option check box has three application types for the user to select from. Selecting any of the Command Type options will also disable the invalid configuration options that cannot be made available to that specific option. These invalid options will be automatically gray out. The example shown below makes it clear to the user that a native application do not require a Jvm Option or a fully qualified class (FQC).
The Native option allows a non-Java application program to be added as an applet launcher. This option allows applications like Mozilla, Xterm, OpenOffice, Gimp and etc. to be used on the Java desktop. The Native option also make use of the current Linux environment path settings to find the desktop applications. Therefore applications that have been properly installed into your Linux environment do not require an absolute file path name, only the application name is required to activate them.
One way that the default desktop differs from the other non-Java desktops in that it supports the Java invokation mechanism intuitively in its activation system. The Jar option allows a Java program zipped into a Jar file to be executed like a native application. No other additional options are required to execute a Jar file, only the absolute file path name to the Jar file is required. An example is the JavaExplorer program shown above. The Jvm option only needs to be used if there are additional customization options required such as limiting the Jvm memory usage, using the server Jvm rather than the default client Jvm and etc.
The Class option allows a class file Java program to be executed. This option allow raw class files to be executed but unlike the Jar option, you need to specify the class path as well as the fully qualified class definition in order to properly execute the program. FQC or fully qualified class means the full package and class name. It is similar to the import statement used in Java code files except that it excludes the key word, import. An example is shown above where there is a MyClass program (MyClass.class) and it resides in a package named MyPackage (package directory), which is found in the /usr/jd4x/jbin directory. If you require more help on this topic, please refer to the Java documentation distributed together with your Java toolkit.
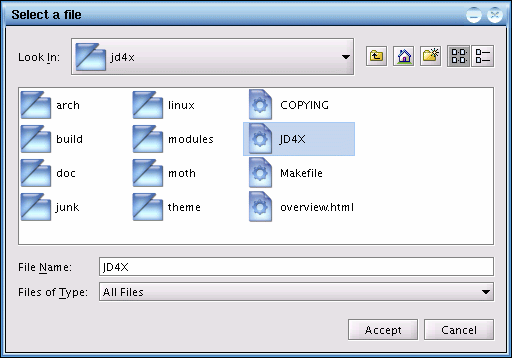
If you want to find a desired icon or program file without having to type the entire path of the file name, you can click on the Browse button. It will produce a JD4X system file chooser for you to browse through your file system and select the desired file. Once the desired file has been selected, click on Accept to finalize your selection.
Adding A New Applet Launcher
To add a new applet launcher, you will need to select the correct Command Type to indicate what type of application the generated launcher will have to execute. Only the necessary parameters will be enabled for you to configure. Refer to the section on configuration parameters for more details. Remember to finalize the changes by clicking the Apply or Ok button before closing the applet editor for it to take effect on the desktop task bar after you are finished configuring the editor's applet panel. If no current selection has been made and the Add button is pressed, an empty item entitled New Launcher will be added such that the user can select and edit it at a later time. All new applet launchers are appended to the last item (right most) in the editor's applet panel.
Deleting An Existing Applet Launcher
To delete an applet launcher, just select the desired launcher to be removed by clicking on the corresponding item on the editor's applet panel and clicking the Delete button. The selected item in the editor's applet panel will then be removed. Once you have finalized you changes, you can click on the Apply button for it to take effect on the actual desktop task bar.
Updating An Existing Applet Launcher
If at anytime, you need to alter any of the current settings, just select on the desired item and make your changes. Once you have made your alteration, click on the Update button to make the changes take effect first on the editor's applet panel before clicking on the Apply or Ok button. If you fail to update the editor's applet panel first, the changes will not be reflected on the desktop task bar when you press the Apply or Ok button.
Configuration Parameters
The Command Type option check box has three application types for the user to select from. Selecting any of the Command Type options will also disable the invalid configuration options that cannot be made available to that specific option. These invalid options will be automatically gray out. The example shown below makes it clear to the user that a native application do not require a Jvm Option or a fully qualified class (FQC).
Native Option
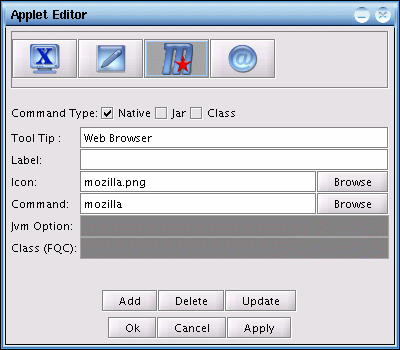

The Native option allows a non-Java application program to be added as an applet launcher. This option allows applications like Mozilla, Xterm, OpenOffice, Gimp and etc. to be used on the Java desktop. The Native option also make use of the current Linux environment path settings to find the desktop applications. Therefore applications that have been properly installed into your Linux environment do not require an absolute file path name, only the application name is required to activate them.
Jar Option
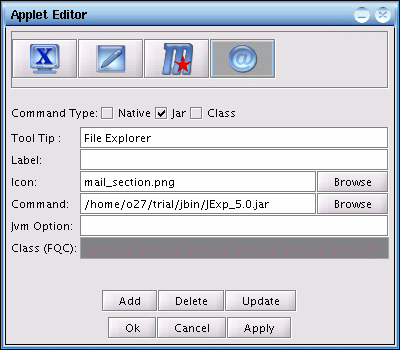

One way that the default desktop differs from the other non-Java desktops in that it supports the Java invokation mechanism intuitively in its activation system. The Jar option allows a Java program zipped into a Jar file to be executed like a native application. No other additional options are required to execute a Jar file, only the absolute file path name to the Jar file is required. An example is the JavaExplorer program shown above. The Jvm option only needs to be used if there are additional customization options required such as limiting the Jvm memory usage, using the server Jvm rather than the default client Jvm and etc.
Class Option
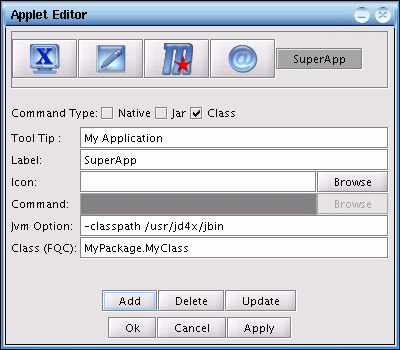

The Class option allows a class file Java program to be executed. This option allow raw class files to be executed but unlike the Jar option, you need to specify the class path as well as the fully qualified class definition in order to properly execute the program. FQC or fully qualified class means the full package and class name. It is similar to the import statement used in Java code files except that it excludes the key word, import. An example is shown above where there is a MyClass program (MyClass.class) and it resides in a package named MyPackage (package directory), which is found in the /usr/jd4x/jbin directory. If you require more help on this topic, please refer to the Java documentation distributed together with your Java toolkit.
If you want to find a desired icon or program file without having to type the entire path of the file name, you can click on the Browse button. It will produce a JD4X system file chooser for you to browse through your file system and select the desired file. Once the desired file has been selected, click on Accept to finalize your selection.
System File Chooser

Adding A New Applet Launcher
To add a new applet launcher, you will need to select the correct Command Type to indicate what type of application the generated launcher will have to execute. Only the necessary parameters will be enabled for you to configure. Refer to the section on configuration parameters for more details. Remember to finalize the changes by clicking the Apply or Ok button before closing the applet editor for it to take effect on the desktop task bar after you are finished configuring the editor's applet panel. If no current selection has been made and the Add button is pressed, an empty item entitled New Launcher will be added such that the user can select and edit it at a later time. All new applet launchers are appended to the last item (right most) in the editor's applet panel.
Deleting An Existing Applet Launcher
To delete an applet launcher, just select the desired launcher to be removed by clicking on the corresponding item on the editor's applet panel and clicking the Delete button. The selected item in the editor's applet panel will then be removed. Once you have finalized you changes, you can click on the Apply button for it to take effect on the actual desktop task bar.
Updating An Existing Applet Launcher
If at anytime, you need to alter any of the current settings, just select on the desired item and make your changes. Once you have made your alteration, click on the Update button to make the changes take effect first on the editor's applet panel before clicking on the Apply or Ok button. If you fail to update the editor's applet panel first, the changes will not be reflected on the desktop task bar when you press the Apply or Ok button.